

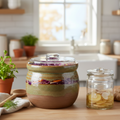


Sprouting jar with ceramic bowl, stainless steel stand and lid with mesh, 1 pc
Available in stock
Frequently bought together

Bag
Bag for dried fruit, red fabric with yellow apples
Choose your option

Bag
Bag for dried fruit, fabric with large cherries, large size
Choose your option
Couldn't load pickup availability
Description
Description
The sprouting jar is undoubtedly one of the simplest and most effective ways to grow your own tasty sprouts at home in just a few days. The pack contains a food-safe sprouting jar, the special screw lid with metal mesh, the ceramic base and the stand on which the jar sits.
The simple methods for growing sprouts described below normally apply to all types of sprouts. The only things that may vary depending on the type are the quantity of seeds to use and the time needed for the sprouts to be ready. A table of sprouting times for several seeds can be found on the packaging.
The sprouting jar is not suitable for mucilaginous (gel-forming) seeds: rocket, cress, flax and basil.
Day one:
Put the seeds in the jar and close it with the lid provided. Leave them to soak in plenty of water (at least 3/4 of the jar's volume) for 8-12 hours. Then rinse the seeds in plenty of water, turning the jar upside down several times and shaking it so that the water does not stand still in the jar. Then place the jar on the metal stand on the ceramic base, where any excess water can drain out. The jar should be placed on a level surface at room temperature (18-25 °C). It must not stand directly under a light source or near a source of heat.
Following days:
On the following days, fill the jar with water and empty it again after 1-2 minutes. This gives the seeds in the jar enough moisture to sprout quickly. Do this at least twice a day (morning and evening) until the sprouts are ready to use. In any case, moisten them whenever the seeds look dry. As on the first day, it is a good idea to shake the contents of the jar well when you fill it with water.
The sprouts grow quickly thanks to their special properties and the room temperature. Once taken out of the jar, they are ready to eat. They can also be kept in the fridge, where they continue to develop very slowly.
With several jars, you can grow different sprouts in each jar, or grow your favourite sprouts at different stages so that you always have fresh sprouts for your meals.
Sprouts are an excellent dietary supplement, especially in the winter months, as they are rich in vitamins, minerals, enzymes, protein and much more, depending on the type of sprout. They are also generally very low in fat.
Sprouts can be used in many ways. Traditionally, they are used in salads, but they are also excellent in stir-fries, sandwiches, toasties/paninis, or lightly fried in, for example, olive oil, tossed in pesto and served over pasta... Only your creativity sets the limits.
Growing:
Generally, the seeds are soaked overnight (although for some varieties this is not necessary). The next day, spread them out in the sprouting trays. Bear in mind that the sprouts will grow to four times their size as they sprout, so don't put too many seeds in the same tray. Then leave them to sprout in a light, well-ventilated place at room temperature. Rinse the sprouts 2-3 times a day until they have fully sprouted.
When growing very small seeds, it is a good idea to place a piece of coffee filter or cheesecloth (item number 1011) in the bottom of the trays until the seeds have started to sprout, so that you don't risk the seeds being washed away when rinsing.
Storage:
Sprouts can be kept in the fridge for up to two weeks, depending on the type of sprout. They are best stored in a sprouting bag (see more options by searching for 4201 and 4202), as in a plastic bag or closed box they cannot breathe and may become slimy and spoil. In a sprouting bag, the sprouts can breathe while the fabric retains moisture. The bag also protects the sprouts from light. The sprouting bag can be closed with the sewn-in drawstring.
Total height: 16 cm
Width: 14 cm
Depth: 14 cm
Jar size: 0.8 l
Easy to clean.
Specifications
Specifications
Storage & shelf life
Storage & shelf life
Growing
Growing


